• Skip to primary navigation
  • Skip to main content

Pine Grove Lighting

  • Buying Guides
  • Styles & Trends
    • Ceiling Fans
    • Bathroom Lights
    • Ceiling Lights
    • Lamps
    • LED Lights
    • Outdoor Lights
    • Smart Lights
    • Wall Lights
  • Wellness & Safety
  • Shop Products

Styles & Trends

How to Safely Install a Ceiling Fan

How to Safely Install a Ceiling Fan

by admin · Jan 25, 2023

Installing a new ceiling fan is a cheap way to save on energy costs all year without compromising on comfort. In the summer, ceiling fans cool down the house by creating a breeze. In the winter, they help circulate the heated air to warm the whole room evenly. 

Putting in a ceiling fan is a win-win for your comfort levels and your budget – and it’s a pretty simple DIY project for homeowners. Plan on giving yourself a few hours (depending on the type of fan and your experience level with lighting DIYs), and grab a friend that can help you hold things in place while you work.

If you’re buying a ceiling fan new, it should come with thorough installation instructions. We always recommend following those instructions exactly to be sure that your fan is installed safely and properly. If you’re installing a secondhand fan, you may be able to find the installation guide online by searching with the model number on the fan. Either way, we’ll walk you through the basic steps here so that you can prepare. 

1. Preparation

Before you break out your tool belt, make sure you have a good plan in place. There’s nothing worse than being in the middle of a project and realizing you don’t have everything you need to complete the task.

Tool Checklist

Before you take on a ceiling fan installation project, make sure you have all the tools you need so you don’t have to rush off to your local hardware store for a last-minute purchase. To install a ceiling fan you’ll need to have a:

  • Voltage Tester
  • Ladder
  • Measuring Tape
  • Screwdriver
  • Ceiling Fan-Rated Junction Box
  • Fan Brace
  • Wire-Cutter/Stripper
  • Light Bulbs
  • Globes/Shades if they aren’t included
  • An extra-long downrod if you’re installing on a sloped ceiling
  • Ceiling Fan and Kit

Choosing the Right Fan Size

Measure the room you’re working in before you start. Not all fans are created equal, so pick one that will fit. Use the following guidelines to help. 

  • For rooms smaller than 75 square feet (like bathrooms), pick a fan with blade spans of less than 36 inches.
  • Blade spans between 36 and 42 inches are ideal for rooms up to 144 square feet. 
  • A 44-inch span is perfect for rooms up to 225 square feet, like a dining room.
  • For rooms that are 225 square feet or larger (a large living room, for example), you’ll need a fan with a 50 to 54-inch blade span.
  • The more space between the ceiling and the fan, the better! The ideal ceiling fan height is 8-9 feet above the ground. 
  • If your ceiling is less than 8 feet, you’ll most likely need to install a flush-mount fan (no downrod).
  • High pitched ceilings typically require you to buy an extra-long downrod (so that the blades won’t hit the sloped ceiling), so check your ceiling height and angle before choosing your downrod.

Pro Tip: Once your fan is installed, the tips of the blades should be at least 30 inches from the walls, and the bottom edges of the blades should be at least 7 feet above the floor. 

Other Important Tips

  • Ceiling fans are heavy! They need to be anchored properly to an electric ceiling box designed to hold the weight of the fan. Inspect the electrical box to ensure it’s fan-rated. There should be an inscription on the box to indicate this. If it’s not, you’ll also need to purchase a fan box before you get started.
  • Check to make sure the light switch you’re using is wired appropriately for the fan. If it isn’t, you may need to call a professional to get the job done.
  • Check the ceiling joists for any wiring or plumbing pipes that may be in the way.
  • If you’re adding a new fan where one didn’t exist, check local building codes to determine if you need a permit.
  • Always check your installation guide for any additional requirements that are specific to your fan. For some expert help choosing the perfect fan for your space, give us a visit or a call and we’d be happy to help.

2. Safety

Now that you’re ready to begin, head out to your circuit breaker and turn the power off for the room where you’ll be installing your fan. Also, make sure all of the wall switches in the room are safely in the “off” position. Do not rely on a wall switch alone to protect you from electrical shock! Always use a voltage tester to be sure the power is off before handling wires.

Pro Tip: Place some electrical tape over the switches you’ve turned off on the circuit breaker. This will prevent anyone from switching it back on while you’re working.

3. Remove Your Old Fixture

Let’s get started! First, you’ll need to take down the existing fixture. Most fixtures have easy-to-find attachment points, like screws or twist-off caps. Remove accessories like light bulbs, shades to get down to the base of your fixture, then unscrew the base from the ceiling.

If you’re removing an existing ceiling fan, remove the light bulbs and globes first. Then, take down the light kit (if needed – some fans have them, some don’t). Unscrew and remove the fan blades next. At this point, you may need to enlist a helper as the full weight of the fan base and motor can be heavy. Pull off the canopy (metal cover at the base of the fan). The last step is to remove the mounting bracket with a screwdriver!

Once you have the base of your fixture dropped away from the ceiling, unscrew the wire nuts connecting it to the electrical box. Be sure to test the wires with your voltage tester first!

4. Install a Fan Box

Before you start, check your existing electrical box. If it isn’t rated to support the weight of your fan, you’ll need to install a new one. To see if your existing box is rated to hold a fan, just take a look at the label! If you can’t find a label, err on the side of caution and get a new one. 

You’ll have to do a little bit of homework here to figure out what will work best for your project. Fan boxes are easiest to install if you have open access, like in the attic or an unfinished ceiling. If you won’t have easy access you may need to widen your drywall hole a little, but you can usually find a brace that will slip through the existing hole. 

Take a look at your rafters to determine the best way to install your fan box. Fan boxes can be attached directly to the rafter with a side bracket. If your new fan won’t be right next to a rafter, look for a brace that will span the space between two rafters. These braces can be a little trickier to install through a small hole in the ceiling, but they’ll give you a lot more breathing room when it comes to getting your fan box in the right place. 

5. Install the Mounting Bracket

To secure the mounting bracket to the fan box, start by threading the wires through the mounting bracket. If the fan has a slide-on bracket, leave the bolts on the junction box, slide the bracket over the mounting hardware, and tighten the screws. For fans without a slide-on bracket, place the bracket over the mounting bolts that poke through the bracket. Then, secure it using the provided nuts. If your fan is a flush mount, pull the wiring through the canopy (the part that covers the wiring/mount bracket) and skip to step 7.

6. Install the Downrod

To set the downrod, you’ll want to find a flat work surface. Slip the canopy onto the downrod and pull the primary wires through the hollow downrod. Then, connect the downrod to the fan base. With the downrod and base assembled, attach the other end of the downrod to the mounting bracket. 

7. Wire the Fan

Next, it’s time to wire! Hang the downrod – or canopy, if you’re installing a flush mount fan – on the hook on the mounting bracket. If there isn’t a good place to hang it, phone a friend to hold the fan up for you to free up your hands while you connect the wires. 

Before you start, check to make sure all your wiring (and the wire nuts) will fit in the ceiling. Use your wire cutters to trim down any wires that won’t. This will also keep them from vibrating against the canopy when the fan is on. Use wire strippers to expose the copper of the wires on the new ends. 

Connect the corresponding wires using the provided wire nuts. Your installation guide will have a diagram to follow, but, generally speaking, the fan’s green wire connects to the ground wire, the fan’s black motor wire connects to the black supply wire, and the fan’s white wire connects to the white (or neutral) supply wire. 

Double-check your work against the diagram, then gently push the wires into the junction box. Lift the fan into position, then clip it to the mounting bracket and secure the screws.

Pro Tip: Some fans come with additional wires for extra features, like having a separate switch for the light and fan. If your switches or wires don’t match the diagram, you might need to check in with an electrician or a lighting specialist at our showroom to help you get things set up correctly.

8. Blades and Bulbs

Now it’s time to install the fan blades. Every fan is a little bit different – but most fans will have an arm or bracket that you’ll need to attach to the blade and then to the base using a screwdriver. Some fans have quick-install blades that speed up the process using keyhole slots that slip over the fan’s mounting screws and lock into place with a little tug. 

Some fans have reversible blades – so make sure you’re checking each time that you have the correct side pointed down!

By now, you should be seeing the light at the end of the tunnel – so let’s install the bulbs! For fans with a light kit, refer to your guide to ensure everything goes in place correctly. Generally, you’ll just need to install the shades, globes, or light cover. If your fan did not come with bulbs, make sure the bulbs you install have the correct base type and wattage 

If your fan came with a remote, don’t forget to install the remote control holder!

9. Lights… Fan… Action!

Last, but not least, it’s time to test out your new ceiling fan! Go back to your circuit breaker and turn the power back on. Try switching your fan and lights on and off using the light switch or remote control. Test all of the speed settings to make sure your fan is secured properly and doesn’t wobble or rattle.

Most of the time, installing a ceiling fan is a pretty straightforward DIY project. Occasionally, an odd issue can crop up due to things like old wiring. If you run into any trouble, be sure to give us a call right away, or call an electrician that can help you troubleshoot the issue.

—

Congratulations DIY master! Now that you’ve successfully installed your new ceiling fan, get ready for a fresh breeze to blow your way–and some savings too. With all that extra cash blowing around, come visit us and we’ll help get you started on your next project. 

—————————-

DISCLAIMER: Be sure to follow all the manufacturer’s installation instructions and take all recommended safety precautions. Check before installing to see if you need a permit and be sure all building and electrical codes are observed. If you have any questions or are unsure about installing the fan yourself, contact a licensed electrician or Pine Grove Lighting for more help.

Filed Under: 2023, Ceiling Fans, Ceiling Lights, How to, Informational, Wellness & Safety

3 Bathroom Dilemmas We Don’t Talk About Enough

3 Bathroom Dilemmas We Don’t Talk About Enough

by admin · Jan 7, 2021

Now that we’ve given plenty of attention to the age-old debate about how to place toilet paper, I think it’s time to move on to something else. A well-lit bathroom can make or break your morning routine, and vanity lighting is a huge part of that! How often do we really stop to consider vanity lighting, however?

We’ve compiled the 3 most vital elements of vanity lighting and a summary of each topic. After you read and feel informed, pick your side! If you haven’t had these debates with your spouse, parents, or roommates yet, NOW is the time. These details can really maximize your bathroom space and transform your morning routine.

1. How to Hang: Up or Down?

The first thing you should consider is how to hang your vanity lights—shining up or down? First, consider how you’ll use these lights. Are they direct task lighting? If so, angle down or at the face. An indirect light source for style and mood? Shine them up.

If you have a bathroom with a darker color palette, a downward hanging light may suit you best. Why? Darker colors soak up more light, and hanging it downward will focus the light on the area you really want to be illuminating.

If your bathroom has a lighter color, palette an upward hanging light will work best for the space. Why? The light reflects off of the ceiling and walls, amplifying the overall light for the entire room. Regardless of which direction you hang them, vanity lights should hang high off of the floor, approximately 78 inches.

2. Clear or Frosted Glass?

You may have already had this debate when choosing other fixtures, but it’s especially relevant to vanity lights. They’re closer to eye level and more frequently viewed than most home fixtures, so choose well here!

In my years at a lighting showroom, the more popular choice has always been frosted glass. Why? One favorite feature about frosted glass is that it shines a soft ambient light. It still provides plenty of lumens, but isn’t too harsh on the eye. They also require less cleaning, since you’re unlikely to see fingerprints or smudges. A weekly light dusting should do the trick.  

On the other hand, I’ve encountered many lovers of clear glass. For one thing, they distribute more lumens, since the glass doesn’t diffuse the light. They’re often better for task lighting, aiding in accurate shaving or makeup application. The exposed light bulbs also add an element of style with different shaped filament bulbs.

3. What Fixture Size Is Best?

There’s a lot of variety in vanity fixtures. Some are small and dainty, others dramatic and large. We’ll let you have those infinite debates of taste as you surf Pinterest or our online catalog, but for now we’ll do you a favor and insert a lesser-known detail about proportions.

If your vanity light fixture is going over a single sink bowl, the fixture should be at least ¾ the size of the length of the mirror. Center it above the sink, and never select vanity lights that exceed the length of the mirror. If your vanity has two or more sinks, the same rules apply and you would center each light over its respective sink.

So there it is—the bathroom dilemmas no one talks about. Lighting matters! And fitting your vanity lighting to your unique taste will ensure an even better morning routine and evening wind-down experience.

Filed Under: 2020, Bathroom Lights, Styles & Trends

Timeless VS. Trendy: Which Works Best In Your Home?

Timeless VS. Trendy: Which Works Best In Your Home?

by admin · Jan 7, 2021

Keeping up with trends, whether commercially or only as an observer, can be a fun hobby! There’s so much variety, beauty, and class in this world. However, trends in fashion, décor, and even lighting, revolve quickly. If you’re thinking of replacing a more permanent part of your home, such as the flooring, plumbing, or lighting, it’s tricky to be trendy and timeless at the same time.

So how do you decide? Should you choose the latest look, with all the “Ooh”s and “Ahhh”s it’ll bring? Or should you be conservative and avoid something you’ll regret in 5 years? After all, tiny details can date a home. You know, wallpaper from the 70’s, pink tile in the 80’s, burgundy and forest green from the 90’s, bronze and faux finishes from the early 2000’s…

There isn’t one right way to go about this, nor is there one easy answer to the “trendy vs. timeless” debate. However, here are a few things to consider.

It’s Not All or Nothing

You may love some of the styles that have withstood the test of time: subway tile, herringbone (fabric and flooring), or wood floors. That’s great! On the other hand, that doesn’t mean that you can’t also incorporate this year’s hot paint colors and some trendy macramé hangings into your décor as well. Don’t try to decide everything at once, and don’t base all your decisions off of one piece of your home.

Consider Your Resale Plans

There are some cases when it’s better to choose trendy décor and finishes, even if the current trend is not your personal favorite. If you’re building a new home, remodeling, or flipping a home with any intention to sell soon, go trendy. Homes that are on trend show well and sell faster.

Avoid Over-Decorating

Though you could argue that “minimalism” is a trend in itself, we’re convinced that good use of space is timeless. Though it can be tempting to fill every shelf or cover every wall with your latest finds, an over-decorated, crowded space diminishes the artistic effect of any style. In addition, it’ll be easier to update your look later if you have few, carefully chosen accent pieces that can rotate with the next trend.

Be Smart About Trendy

If you’re like most people, you probably don’t have unlimited time and funds to remodel the kitchen or buy a new couch every time popular trend takes a new direction. However, there are plenty of simple, cost-effective ways to make your space trendy and new. Here’s a list of our favorite ideas!

1. Change an indoor paint color. Indoor paint runs its course in about 5 years, so it makes sense. You could even start with a small room… less time, big reward!

2. Rotate your rug or change it altogether. Rugs have a natural knap to them depending on how they are woven. A quick rotation may surprise you with a significant difference.

3. Update your throw pillows on the bed and couches. It’s a quick, cost-effective change!

4. Especially during the winter, add a plant or some kind of earthy décor element to bring a natural, refreshing feel to your space.

5. Switch out some art. Frames may be pricey, but prints usually aren’t! Buy a new family photo, modern print, or custom piece of art to freshen up your frames

6. Replace a key lighting fixture. In addition to updating your look, switching to new bulbs will save you money on your utility bill. Check out our catalog for some good recommendations!

7. Buy new dish towels or dinnerware. An extra pop of color can change the atmosphere in the kitchen or add some extra fun at dinner. 

Make Your Home Your Own

Trends will come and go… And traditional styles? Even there, there’s a ton of variation! Contemporary. Transitional. Rustic. Vintage. Urban. Eclectic… no matter the style, take the time to create a home environment that speaks to you. If it suits your needs and appeals to your unique style, it’ll be timeless. Best of luck from Pine Grove Lighting in your decorating adventures!

Filed Under: 2020, Ceiling Lights, Styles & Trends

Lighting Design to Match Your Home: Modern, Traditional, and Transitional Lighting Styles

Lighting Design to Match Your Home: Modern, Traditional, and Transitional Lighting Styles

by admin · Jan 7, 2021

When our clients furnish a new home or upgrade their lighting, one of their main concerns is matching light fixtures to their overall design. After all, what kind of lighting look good with shabby-chic or modern farmhouse décor? It’s a valid question!

Just like fashion or interior design, lighting fixtures can be divided into general styles based on common qualities and trends. It’s worth looking into—knowing what general style you’re looking for can help narrow your search to only the fixtures that fit you best. Read on to learn more about the three main lighting categories: Modern, Traditional, and Transitional.

Modern

In architecture, it might look something like that. As for lighting, the modern style was born in the early 20th century and hit peak popularity in the 1950s and 1960s. Modern designs are often minimalistic with neutral tones. Lighting fixtures, like the one below, incorporate straight, clean lines with a seamless flow. 

Popular materials are bubble glass and natural materials, such as wood and metal. LED integrated fixtures are also the epitome of “modern”. For further examples, browse the Stix Collection from Sonneman – A Way Of Light. Similar fixtures showcase minimally scaled LED linear pendants and wall bars in a variety of lengths, finishes, and lighting configurations. 

Traditional 

Traditional style lighting and design has staying power! Like the timeless architecture above, these light fixtures last a long time and never go out of style. Traditional design is typically more formal and ornate. These refined fixtures, like the one below, feature intricate details and thoughtful design. Often inspired by classic architecture, traditional lighting fixtures add sophistication, warmth and richness to a space.

Bronze, brass and gold are commonly used materials within traditional decor. Traditional style usually matches from room to room, blending consistently throughout the home. For example, this Lorainne collection from Savoy House features oxidized black metal rods, along with arms and lamp posts topped with soft white fabric shades. It’s airy yet eye-catching, polished yet playful.

Transitional 

Find yourself drawn to styles a bit more unique, yet not quite as minimal as modern architecture? Transitional style is extremely versatile and widespread, making it hard to define but easy to love. In essence, it’s the midway point between traditional and modern lighting styles. Transitional pieces are less ornate than their traditional counterparts, but not as streamlined and out of the box as modern fixtures. They combine the best of both worlds for a clean, comfortable, contemporary look. 

Like in the fixture above, neutral colors are popular here, along with fabric and wood. Brushed brass and black are common finish colors, like the warm brass in the Kearney Collection by Savoy House. These fixtures have gently rounded brass rectangles surrounding a vintage black candelabra. The four lights have clear glass covers and a warm color temperature. The look is clean and sophisticated, making it the perfect piece for a transitional home. 

Feeling more equipped to find your perfect fixture? Obviously, there are plenty of variations on these three main groups of design, such as: Modern Farmhouse, French Country, Mid-Century Modern, and Contemporary. If you’re interested in learning more about those styles, or anything listed above, give us a call! Pine Grove Lighting is here to make home lighting easy.

Filed Under: 2020, Outdoor Lights, Styles & Trends, Wall Lights

How LED Technology Will Forever Change the World

How LED Technology Will Forever Change the World

by admin · Jan 7, 2021

During my time in the lighting industry, I’ve received countless questions about LED lights. What are they? How are they different from traditional light sources?  How do they work? Why are they more expensive? And the list goes on…

This guide will teach you the ins and outs of LED lighting and how to use this innovative technology to your benefit. We’ll cover the very basics and some more advanced concepts, so buckle up and get ready to see how LED lighting could transform your home lighting!

1. Yes- They Use Electricity

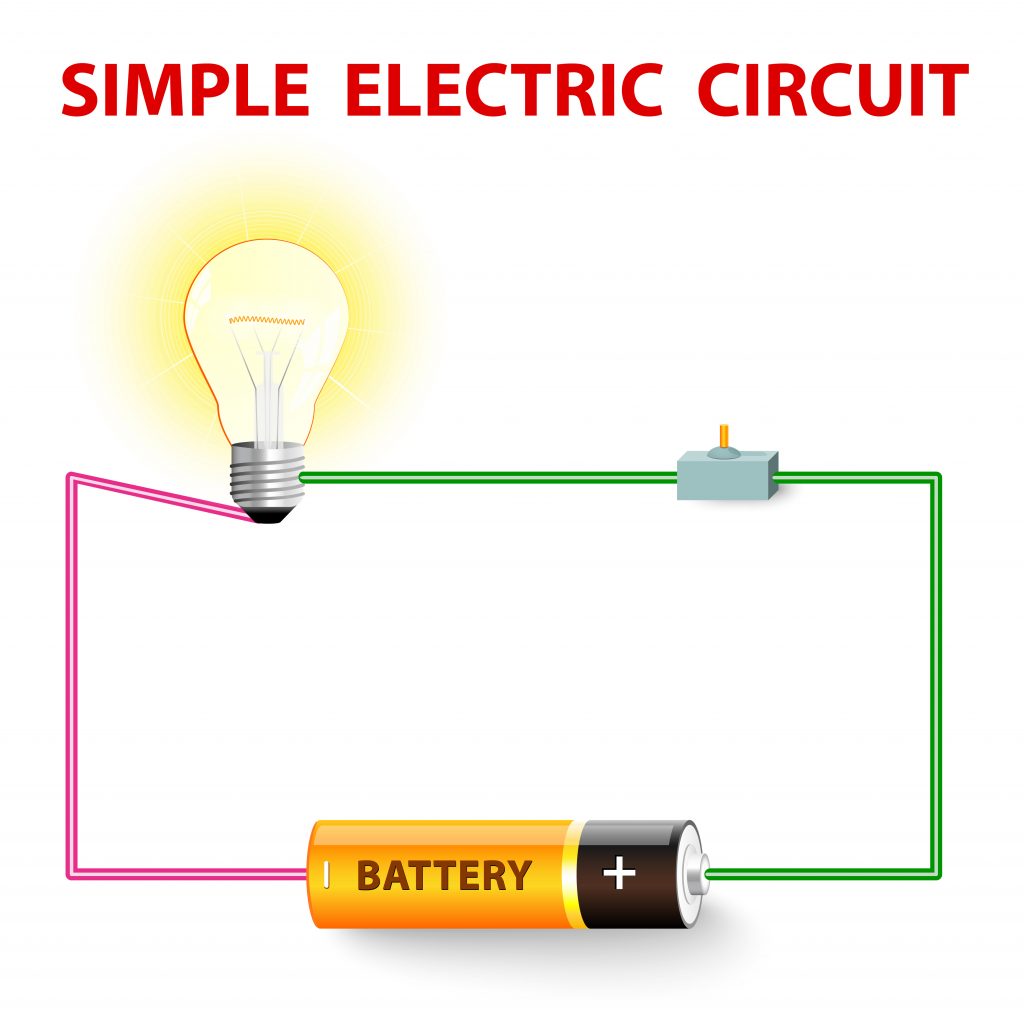
Electricity is created by the flow of electrons from a positive end of a power source (such as a battery), through a conductor (usually copper wire), through the item that is being powered (in this case a lightbulb), and then back to the negative end of the power source. This is called an electrical circuit, because the electrons ultimately end up in the same place they started.

This method of transferring power applies to household appliances, cell phones, modern cars, and LED lights.  With any of these devices, functionality depends on an unbroken circuit, and usually, a switch to control it.

2.  They’re Not Like Incandescent Bulbs

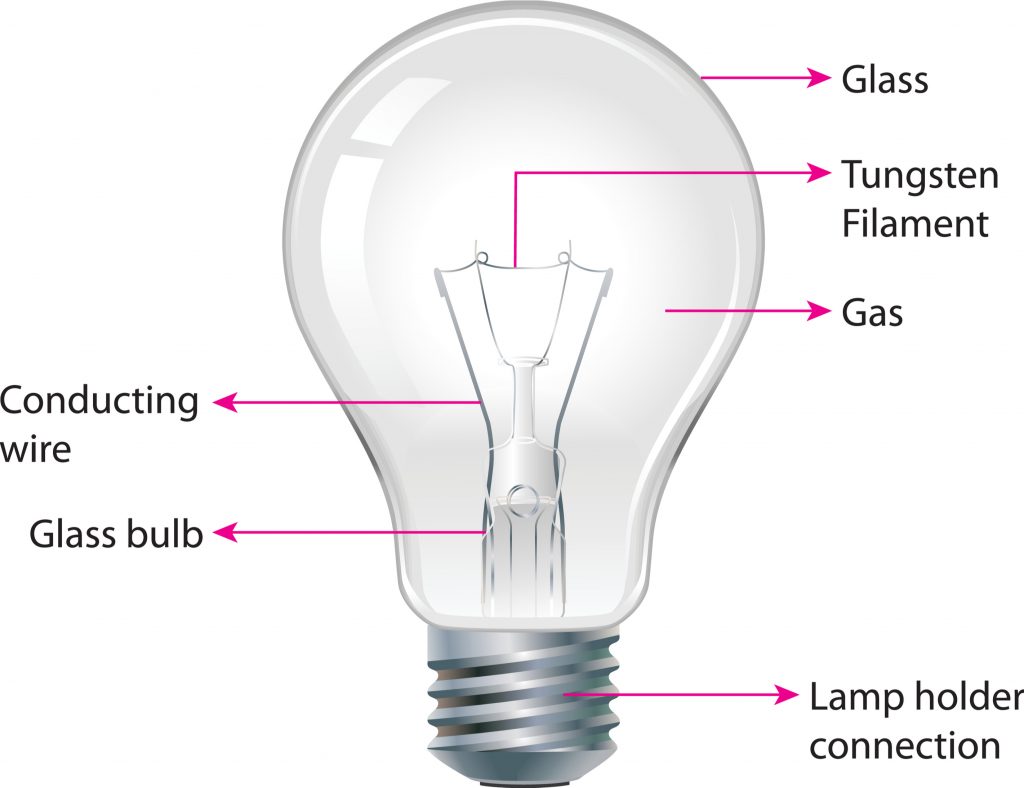
Our idea of light bulbs stems mainly from the traditional incandescent bulb. Let’s imagine one like this image, which is a medium base, A-style lamp. The light bulb threads into a phenolic lamp socket, more commonly referred to simply as the “light bulb socket”. As the bulb is placed inside the socket, the lamp holder connection makes contact with the leads inside the socket. Turn the power on, and an electrical current flows through that connection to the tungsten filament, heating the metal and causing it to release energy in the form of light. 

This heat energy inside the pressurized globe of the bulb creates the light that shines from incandescent bulbs. Most of them require roughly 40-100 watts to produce light, but this obviously depends on the brightness of the bulb. LED’s function quite differently, so let’s take a look at how an LED will react to the same electrical current.

3. They’re Built to Create More Light

LED stands for Light Emitting Diode. The science here is a little dense… But I’ll do my best to cover the basics. A light emitting diode is made by pressing three layers of semiconductor material together. These materials vary in composition depending on the application, but often include zinc and nitrogen (as opposed to tungsten carbide in incandescent bulbs).

When an electron enters the diode, it is charged with more energy than it originally had. This is called electronic excitement. While it is still inside the diode it passes through the diode’s layers and releases this excess energy in the form of light!

4. They Come in Infinite Shapes, Sizes, and Colors

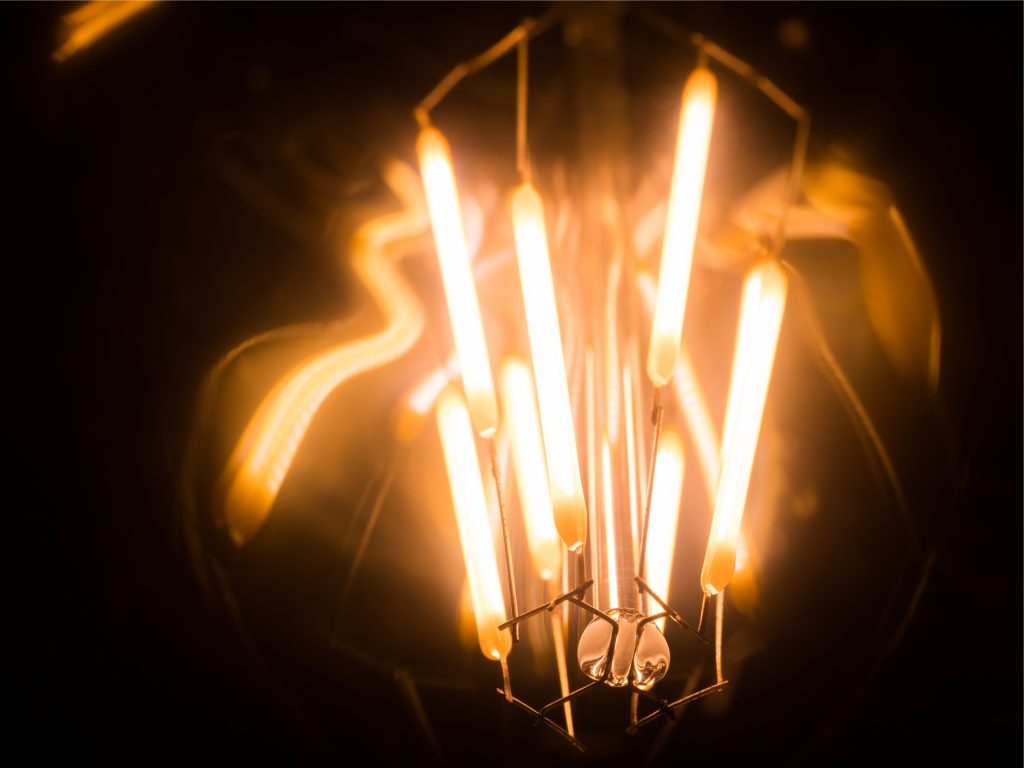
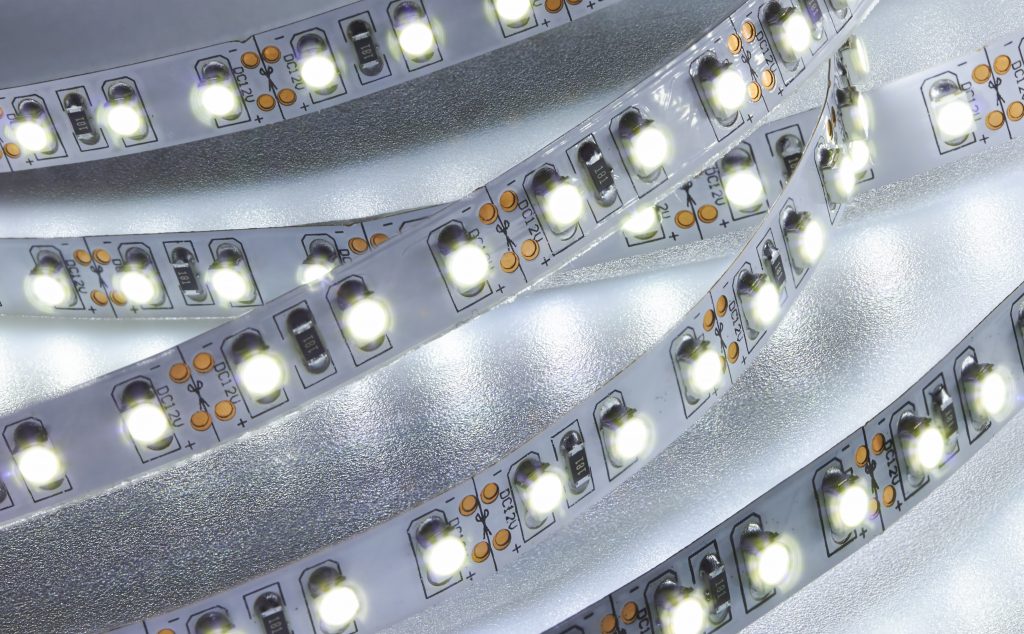
Because of the way they are made, diodes come in practically any shape and size. They can be stretched out to look like a filament inside of a traditional glass light bulb or formed into a small square. Quantity of light also varies, and many LEDs use multiple diodes to produce even more light. It’s amazing technology—even in these various shapes and sizes, most LEDs also contain a transformer, or voltage regulator, inside the bulb or fixture to regulate their energy usage.

5. They Last a Long Time

One of LED’s many benefits is their long life. They last much longer than traditional bulbs because they don’t produce nearly as much heat as their more traditional counterparts. With LED lights, you can practically say goodbye to burnt out bulbs! This explains why their upfront cost is slightly more than older bulbs—with LEDs, you won’t be purchasing new ones very often, and the money you spend on the bulb is quickly recuperated in saved energy costs.

6. That’s Right—They Save You Money

As mentioned, the process of electronic excitement uses far less energy than heating the filament in a traditional bulb. In fact, an LED light bulb uses as little as 14% of the energy burned by an incandescent bulb! This means that by changing home light bulbs to LEDs, the average American will save over $1,000 in a 5-year span. If you have other types of lights in your home, such as halogen bulbs, you can save even more than that!

7. LEDs Maximize Existing Fixtures

Another overlooked benefit of LED bulbs is their ability to effectively exceed the maximum wattage of light fixtures. Sounds crazy, but it’s something you’ve probably thought about before! When a room in your home feels dingy or underlit, it’s probably not because the fixture is old or inadequate. More than likely, the bulbs simply aren’t providing enough light for the room.

Typical light fixtures can power a 60 watt incandescent bulb, but because LED bulbs are so much more efficient, that same fixture could power a 100 watt equivalent LED bulb! This provides much more light than the fixture could normally provide, and allows the flexibility to choose from various light colors. Not only will LEDs save you on your utility bill, but they can also save you from buying new fixtures.

8. The Sky Is the Limit!

Now that you’re an expert on LED lighting, start imagining the infinite ways they could light up your home! Because they are so small, they hide easily under kitchen cabinets or alongside a staircase to light up the steps. They could add a dramatic flair to a theatre room or simply update the recessed lighting in your home, providing a more consistent brightness. My favorite LED distributor, Alloy LED, provide a wide range of products for almost any lighting project, and they might spark some ideas for your home. And as always, we’re here for any of your lighting needs! Stay lit, my friends!

Filed Under: 2020, LED Lights, Styles & Trends

Why Your Bathroom Needs a Real-Life Magic Mirror (you will never be the same)

Why Your Bathroom Needs a Real-Life Magic Mirror (you will never be the same)

by admin · Jan 7, 2021

When fairy godmothers and magic wands are lacking, you can still treat yourself to a dramatic transformation each day, if your bathroom is a magical space. Of course, many details work together to create the perfect space, but one of the best ways to start is to make sure you get two essential elements working together… lights and mirrors.

This is where the beloved illuminated
mirror comes into play.

With clean lines, stylish designs,
and unmatched light quality, mirrors with built-in lights create sophisticated statement
pieces for modern bathrooms. They have an unusual ability to help you transform
yourself and your space at the same time.

At Pine Grove Lighting, we’ve been drooling
over these mirrors for a while now, but most people still haven’t heard of
them! So with that said, here are four ways that an LED illuminated mirror
create a little bit of magic in your bathroom.

LED
Illuminated Mirrors

1. They Amplify Your Style

LED mirrors come in many different
sizes to suit many needs, including those short or boxy bathrooms. They add a
sense of drama and sophistication to a room, and they showcase the wall behind
the mirror. Adding some kind of feature on the mirror wall now has DOUBLE the
impact, whether it’s a cool backsplash or an accent wall color.

2. They Add Atmospheric Lighting

LED illuminated mirrors provide an
even tone of light and a glow throughout the room. Many of them even have an
adjustable color temperature between warm white, natural white, and cool white.
Whatever you’re feeling, these mirrors have a mood lighting to match.

3. They Maximize Your Bathroom Tasks
for a Better Look

Whatever your morning routine looks
like, an LED mirror is sure to make it easier. Focused mirror lighting gives
you a clearer view of your face, improving make-up application and anything
else. I promise I’m addressing the men here, too—the extra light also helps
with shaving, since you can more easily see any spots you may have missed.

4. They Magically Defog Themselves

As if this couldn’t get any better,
some of our favorite LED mirrors now come equipped with a defogger in them. What
could be better than getting out of a hot steaming shower to a totally clear
mirror? Enjoy that steamy goodness while you move on with your necessary tasks.

Ready to take a look for yourself? In addition to all of the perks listed above, they offer even MORE great features, such as:

  • Touch Control Technology
  • Waterproof Grade
  • Built in night light
  • ETL Certification
  • 3 year warranty

Visit us here.

Filed Under: 2020, Bathroom Lights, Styles & Trends

« Previous Page

Copyright © 2025